Thursday, April 16, 2015

Busy busy!

Things have been heating up in the shop the past few months! I've made a concerted effort to see if I can get some custom business coming in, and it has worked. Its a great pleasure to be able to do something I really enjoy and make a little bit while doing it. I keep my prices low because of that fact. Too often I see ridiculous prices on live edge furniture, and wonder if the people buying them really know what went into them. That's not to diminish the work and the process. It IS work. It does take time. However, I've seen pieces where the asking price is more than if you were to order one from the Nakashima studios. To me, that seems ridiculous.
I was commissioned to do two pieces for a local salon called Barberella Salon. The owner wanted a simple receptionist desk and a small side table for the waiting area. Since the space she was opening in had some very cool wrought iron details, I suggested a vintage wrought iron sewing machine base for the receptionist desk and wrought iron hairpin legs for the side table. The owner was on-board with that so I got to work. I happened to have two slabs on-hand that worked well for the applications, so I got to work.
Both tables got a few rosewood butterfly keys to stabilize checks and for added appeal. A tung oil varnish finish was also applied and buffed to a satin finish.
Now, its on to a bench project I've just been commissioned to do...


Wednesday, August 20, 2014

A Cut About the Rest

Two walnut boards marked up for cutting
It's been a while since I have posted. I've been busy in the shop as of late, however. I got a lot of positive feedback and interest from the first cutting boards I made. For a few years I have been eager to see if I could make some money selling furniture and other things that I've made, so I decided to wade in slowly by doing some cutting boards and putting them up for sale. I decided to keep the design minimalistic, so the emphasis was on the beauty of the wood, not things like fancy handles etc.
For functionality's sake, on larger boards I decided to add a hole to make it easier to pick up and carry.
So off I went.
I bought  few pieces of walnut and also grouped together some cutoffs and scraps I had around the shop. All told I would have about 25 cutting boards. The process was similar to the one used on the furniture I'd made, only on a smaller scale. Also, to save time and make things easier, I grouped together the steps, so I would do one step at a time on all the boards.
Cut down to rough size 
You can view and buy cutting boards I've made on my etsy page here https://www.etsy.com/shop/whWoodworker. I also plan on selling at local craft fairs and festivals.
Cutting boards after cutting them to size, drilling holes, and a few rounds of sanding. They'll get one final sanding at 400 grit before a food-safe beeswax and mineral oil finish is applied. 
I designed a logo and had a brand made of it, which is placed on the underside of every board.

This is a large 15" x 24" custom walnut cutting board I made. The customer also requested a maple butterfly key.

A beautiful example of one of my live edge walnut cutting boards. I love the balance between sap wood and old on this one.

Friday, January 10, 2014

Cutting it Close

Christmas was getting closer, and I hadn't gotten any gifts yet. I was working in my shop and saw a live-edge walnut board I'd bought a few years ago. I immediately thought about the nice cutting boards I'd seen online and thought it would be a nice, easy, handmade gift I could make.
I did a little research, as I'm prone to do, and got started. I decided I would make one for my parents, one for my in-laws, and one for our home. With a roughly 48" board, I thought 16" was a nice length.
The process was pretty straightforward: cut the boards to length, plane both sides, drill the handle on the drill press, ease all the sharp edges, and finally do the finishing process. One board had a knot in it with a small crack, so I decided to do a rosewood butterfly key to keep moisture from getting into the wood and also to stabilize the crack. I used Titebond III for the key, which is a food-safe glue.
Prior to cooling, the finish took on a nice, yellow glow
For the finish, it had to be first and foremost food-safe, followed by attractive, yet somewhat durable. I found a nice recipe online for an easy finish consisting of 1/5 all-natural beeswax and 4/5 mineral oil. I decided that I would make enough finish to give a small jar of extra finish along with the cutting board, since a beeswax finish should be renewed often to maintain its ability to be waterproof. I heated the mineral oil on medium-low heat and slowly dissolved the bars of beeswax in it. Once the beeswax was fully emulsified, I let the mixture cool just a few minutes. Then, using a clean, lint-free cloth, I wiped the oily mixture on each board. Soon after wiping it on, the substance took on a waxy appearance. After leaving it sit on the boards for a few minutes, I took a new, clean cloth and buffed the excess wax off. I repeated this process for each board twice. I was very happy with the results. I hope to find other small projects to do as holiday gifts in the future.
I liked that each board had its own characteristic grain, despite being from the same board 
The small rosewood butterfly key was a nice touch 


Tuesday, April 30, 2013

It's been way too long! We had a minor catastrophe at home and we've been dealing with two bathroom renovations, so that's pretty much taken away my woodworking time. On the plus side we'll have two new, modern bathrooms that meet our tastes. So, it's a win in the long run!
Me being the way I am, I couldn't possibly complete a renovation without somehow working in a woodworking project. The upstairs bathroom was no different.
I did my homework on live edge vanities and decided to give it a go. My first concern was durability of the vanity as a whole and making sure that the finish on the slab would hold up. Luckily I've used waterlox in the past and after some reading I was certain that would be my best option, provided I do enough coats.
We needed a vanity with storage so the next question was whether or not to build a vanity or repurpose one. The decision was made to purchase a vintage dresser or credenza and put the slab on top of that. Plus, I'd yet to do casework and was leery of my first cabinet going in this bathroom. After some searching we found something very close to what we were looking for at www.midcenturyfurniturewarehouse.com/.
The credenza and slab. We ended up going
with a smaller sink in the end.
Next was another case of my being antsy to get a suitable slab. I went to my usual sawmill and looked at some walnut slabs. The supply was pretty limited at the time, and rather than wait I instinctively bought one I thought would work.
Of course, in my haste I neglected to notice that through the middle of the slab the width curved in a good amount. As it turned out, through the middle this slab was maybe 2"-3" too narrow to cover the width of the cabinet we'd gotten. I was pretty upset over this because I knew I'd goofed up and we'd already spent a good deal on the cabinet. So what I decided to do was split the slab lengthwise and drop in a plank of cherry. I had never used cherry, nor done a glue-up, so here was my big chance.
I went back and got a cherry board and then it was time to get cracking.
Flattening with a
router sled.
First, as usual, I had to surface the slab and do my butterfly keys, since this slab had some sizable checks. I used rosewood for my butterfly keys since I think they look the best with walnut. After that it was time to decide where to cut the slab lengthwise. I decided off-center would look cooler and more modern so I went with that. Then I went about squaring, surfacing and planing the cherry board.
One of three rosewood
butterfly keys I added.

Next, it was time to joint and edges of the slab where I'd cut it. First I attempted to do it on my jointer but that proved too difficult with the length of the slab and maneuvering the uneven top edge.
Then I tried a simple circular saw straight jig, followed by a jointer plane. I wasn't thrilled with those results either. Finally, I clamped a long piece of melamine to the top of each piece of the slab and used a top bearing router bit to joint the edge. This technique ended up working great and I really recommend it for jointing long boards. Just be sure your melamine (or plywood etc) has a clean edge and that you do not rock your router at all.
Jointing with a router.

My first-glue-up went pretty smoothly actually. Aside from a little unevenness between the cherry and walnut I was happy. I was going to have to resurface the top anyway.
Now for the fun and-or scary part: since this slab was topping a cabinet in a bathroom, I thought leaving those checks open in a wet environment would be pretty stupid. There was little chance water would never get in there and into the cabinet. So I did some research on people who'd used resin to fill checks in slabs. I ended up getting a clear resin from these guys, www.artstuf.com/.
This was my first foray into using resin so I was nervous. I didn't want to mess up this slab or have checks in it either, so this had to work the first time. I knew I had to do a great job of closing up the bottom side of the cracks so I wouldn't have any leaks. I also had read about heating the resin with a hair dryer to try and minimize the formation of air bubbles inside it.
So, I taped the hell of out the bottom side of the checks, the ends of the slab, and around the edges of the checks on the top with painters tape. I mixed my resin and started... About 15 minutes in, I started to see both sides dripping out the bottom; one side was dripping every few seconds and the other, maybe every 10 seconds. I was panicked. I did what I could to use some more tape to try to slow or cease the drips. It turns out the edges of the slab were too rough for painters tape to create a great seal. I should have noticed that. So the resin was creeping out the end and out the sides of the tape. Re-taping slowed the dripping a bit, as did the eventual drying process of the resin. I had to come back the next day and add more but in the end it worked. I let the resin cure another day and prepared to sand it off. Luckily it sands pretty easily. Getting the tape off proved to be a pain so some was simply sanded off. I treated the resin just like wood in that I started with a low grit and worked my way up.
Prepped for my first try at using resin.

The only thing I did differently with this top was sand it to 800. I'd read that in order to get a decent smoothness and clarity to the resin you have to go high with your sanding. I used 3m wet/dry sandpaper.

So after that it was basically just doing my waterlox routine. As far as attaching the slab, I allowed for movement using a slot cutting bit before screwing in through brackets on the underside.
So, it was a fun project. I got to do a few new things and learned some things. I'm happy with the results and like having something a little different in our bathroom.

The finished top with the sink installed.

Friday, April 27, 2012

1,000 Reasons for Concern

The black walnut may be a thing of the past. There's a threat to it and it's real and happening. 1,000 Cankers Disease has made it's way to the east coast, in my county, in fact. It's a disease that affects black walnut trees and there is no known cure. Trees can die in as little as 1-3 years from first observation of symptoms. Needless to say I am concerned. For more information, please see this link:
http://www.agriculture.state.pa.us/portal/server.pt/gateway/PTARGS_0_2_75292_10297_0_43/AgWebsite/ProgramDetail.aspx?name=Thousand-Cankers-Disease&navid=12&parentnavid=0&palid=137&.

Monday, March 12, 2012

A Place to Sit

Well, I've finally finished my walnut Nakashima style bench. I feel like I crossed some kind of threshold with this project. I've gotten more confident in the processes and techniques, and really I am just moving quicker than I had in previous projects. This is one project where I can sit (no pun intended) back and say I wouldn't have done anything differently. That's a very satisfying feeling to have! I do have to keep reminding myself that to this point I don't have many projects under my belt. I haven't tried anything all that difficult yet either; it's all been mortises and tenons, butterfly keys, etc. to this point. But anyway... I am happy with my progress.
Finishing the other leg and it's mortises/tenons went faster than the other side. One thing I really liked about Nakashima's bench were the "scooped" shape at the bottom of his legs. I remember reading that he liked to do this instead of legs with a flat bottom, because floors are rarely level, so four points of contact are better than 2 large points of contact.
I was pretty happy with how the leg
tenons fit their
corresponding mortises.
The braces inside made the

joint very stable.

I went with a Waterlox finish on this bench. Waterlox is quickly becoming my best friend. I used it for the first time when we finished our butcher block counter tops during a kitchen renovation last year. After that I used it on some custom oak thresholds I had to make between the kitchen and adjacent rooms, and then on a custom fireplace mantel and shelves. I've found waterlox to be very easy to use and the finished product speaks for itself. It's a little pricey but when you think about what you put into lumber and hard work, why skimp at the most critical step?
So now that this bench is complete, I can focus my attention on it's older brother, the walnut trestle table...
A close-up of one of the rosewood butterfly keys on the bench top.

The grain on this is amazing.


Wednesday, February 15, 2012

Sitting on the [live] edge

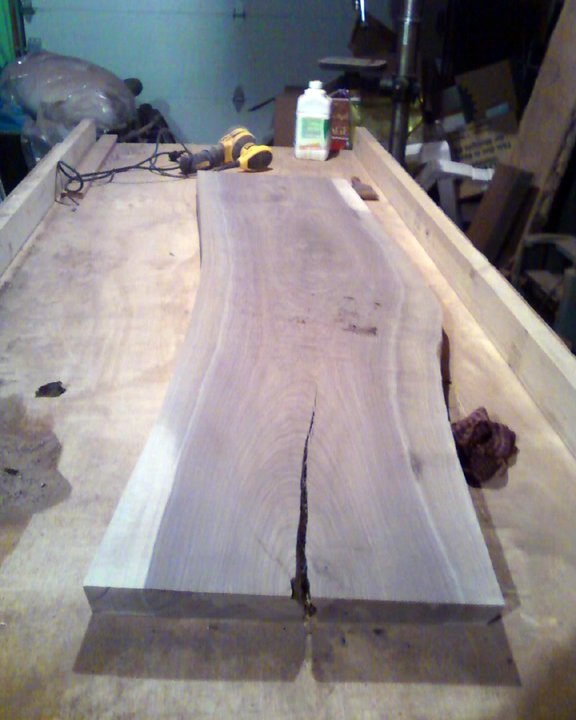
There's something very twisted about this board. Very twisted. And, I don't like it.


A quick look at the discrepancy with how
much was taken off shows just how
badly the slab was twisted.
Ever since my coffee table project, I yearned to make a live edge walnut trestle table. Given my obvious fondness for Nakashima's work, I wanted to emulate his trestle table design. I made the trip to a small sawmill operation close by and asked the owner if he had any live edge walnut. He lead me to a shed and showed me what he had. Being a smaller operation, there was not a lot to choose from, but two bookmatched slabs looked good to me. This being the second time I'd ever bought walnut, and me possibly being a little giddy at the thought of a new project, my impatience may have gotten the best of me. I bought the two slabs and headed home. Shortly after getting home, upon further examination, I noticed that both slabs were severely twisted. This is something any woodworker should have noticed right off the bat when buying lumber. I, on the other hand, did not. I was pretty disappointed in my haste and wondered what the heck I was going to do. After some quick research I found that you could flatten twisted stock, the only downside being you'd lose thickness and most likely have to cut off some length if the stock was too twisted and not very thick. So I found a method for flattening stock by using a router flattening jig. I fashioned a pretty rudimentary jig from angle steel, which I attached to some 2x4 stock. The jig would run along rails fastened to a large panel of plywood. I'd found more complex jigs but for my purposes I decided to go quick and easy with it. After shimming the slab until it was level, I used a fairly large router bit and simply worked my way down the stock, taking off little by little, until one side was flat. Then I flipped the slab and repeated it.
The Nakashima bench at the
Michener Museum is right out
in the open to view (or sit on).
I still had a good amount of thickness left, but I did have to cut off some from the end that had gotten too thin for my liking. It was then I decided that these slabs were now probably smaller than I wanted my table to be.
One thing I really liked was that as I flattened the stock, I noticed it was some great grain going on. I'd seen Nakashima's benches and really liked them as well, so I decided a bench would make a nice companion for this yet-to-be-made trestle table. Plus, I was quickly learning you can come up with any number of projects that "need" to be done, and thus, excuses to buy more wood (I was becoming an addict!).
Flattening the slab made a
huge difference,and I loved how
closely it's shape was to that
of the Nakashima bench I'd seen.
So back to the researching I went; examining photos of Nakashima benches, and getting an in-person examination of a few at the Nakashima property and the Michener Museum in nearby Doylestown, PA. I like being a little exacting with my work, so things like height of the bench in comparison to Nakashima's and dimensions of the leg etc. mattered to me. I came up with some specs and got down to it; removing the bark from the edges with a draw knife (another tool given to me by my father-in-law), and then cleaning them up. To take care of the checks that had formed on either of the slab, I cut some rosewood butterfly keys on the bandsaw; a larger one for each end, and a small one to add a little further in from one end. I took this opportunity to cut some extra butterfly keys for future use too.
I'd decided I wanted to do a bench with wide, slab legs on each end, for the sake of building something that would probably hold up longer than if I'd used turned legs on one or both sides. So next I had to map out my mortise and tenons, cut those, and then shape the bottom profile of the slab leg. I used my router to make the mortises and used the bandsaw, router table and handsaw to cut the tenons. After a nice test fit (a perfect 90 degree angle!) I did the glue-up. Nakashima often used a block hidden on the inside of his slab legs to add strength to the joint, so I thought it would be a good idea to do the same. I quickly squared up an extra piece of walnut and got some dowels. I decided two dowels going into the leg, and two going into the bottom of the bench would be more than sufficient. The leg dowels would be blind mortise and tenons, and the ones going into the bench would be through tenons.
I'm almost done with this project, unfortunately it's taken a backseat to everything else I have going on. I have to flatten one more slab leg, cut the mortises and tenons for that and join it. Then it's on to sanding and finishing... I hope to get back to this project within the next month or so! You can view and purchase furniture I've made, like this, here https://www.etsy.com/listing/204007357/live-edge-walnut-side-table-coffee-table?ref=shop_home_active_1.


Since this project I've stopped tracing my keys with a pencil and instead have used an exacto knife.
I have found this method makes it a lot easier to get a nice, snug fit.
I love the subtle curve Nakashima used at the base of his bench. It's visually appealing and also serves a purpose:
to make the bench sit on all fours, even on an uneven floor.
There's something really cool about cutting tenons, especially finishing them off with a hand saw.

During glue-up of the leg I had a small mishap and accidentally chipped the edge of the leg in a small area.
So, I had to glue and clamp it back on.

A perfect 90! Nice...


Nakashima did not use through tenons on the dowels in his braces. I decided to go ahead with it because I thought
it looked cool and also would provide even more strength and support to the joint.


The best surprise, and the thing I am probably most excited about with this project, is the amazing grain all over this walnut.
There is "fire" throughout the grain as well as some crazy rippling and feathers going on. Applying the finish to this bench
is going to be a labor of love and a fun time.

More great grain. Cheap, twisted walnut ended up with a nice secret within.