The black walnut may be a thing of the past. There's a threat to it and it's real and happening. 1,000 Cankers Disease has made it's way to the east coast, in my county, in fact. It's a disease that affects black walnut trees and there is no known cure. Trees can die in as little as 1-3 years from first observation of symptoms. Needless to say I am concerned. For more information, please see this link:
http://www.agriculture.state.pa.us/portal/server.pt/gateway/PTARGS_0_2_75292_10297_0_43/AgWebsite/ProgramDetail.aspx?name=Thousand-Cankers-Disease&navid=12&parentnavid=0&palid=137&.
Friday, April 27, 2012
Monday, March 12, 2012
A Place to Sit

 Well, I've finally finished my walnut Nakashima style bench. I feel like I crossed some kind of threshold with this project. I've gotten more confident in the processes and techniques, and really I am just moving quicker than I had in previous projects. This is one project where I can sit (no pun intended) back and say I wouldn't have done anything differently. That's a very satisfying feeling to have! I do have to keep reminding myself that to this point I don't have many projects under my belt. I haven't tried anything all that difficult yet either; it's all been mortises and tenons, butterfly keys, etc. to this point. But anyway... I am happy with my progress.
 Finishing the other leg and it's mortises/tenons went faster than the other side. One thing I really liked about Nakashima's bench were the "scooped" shape at the bottom of his legs. I remember reading that he liked to do this instead of legs with a flat bottom, because floors are rarely level, so four points of contact are better than 2 large points of contact.
 |
| I was pretty happy with how the leg tenons fit their corresponding mortises. The braces inside made the joint very stable. |
I went with a Waterlox finish on this bench. Waterlox is quickly becoming my best friend. I used it for the first time when we finished our butcher block counter tops during a kitchen renovation last year. After that I used it on some custom oak thresholds I had to make between the kitchen and adjacent rooms, and then on a custom fireplace mantel and shelves. I've found waterlox to be very easy to use and the finished product speaks for itself. It's a little pricey but when you think about what you put into lumber and hard work, why skimp at the most critical step?
So now that this bench is complete, I can focus my attention on it's older brother, the walnut trestle table...
 |
| A close-up of one of the rosewood butterfly keys on the bench top. |

 |
| The grain on this is amazing. |


Wednesday, February 15, 2012
Sitting on the [live] edge
 |
| There's something very twisted about this board. Very twisted. And, I don't like it. |
 | |||
| A quick look at the discrepancy with how much was taken off shows just how badly the slab was twisted. |
 |
| The Nakashima bench at the Michener Museum is right out in the open to view (or sit on). |
One thing I really liked was that as I flattened the stock, I noticed it was some great grain going on. I'd seen Nakashima's benches and really liked them as well, so I decided a bench would make a nice companion for this yet-to-be-made trestle table. Plus, I was quickly learning you can come up with any number of projects that "need" to be done, and thus, excuses to buy more wood (I was becoming an addict!).
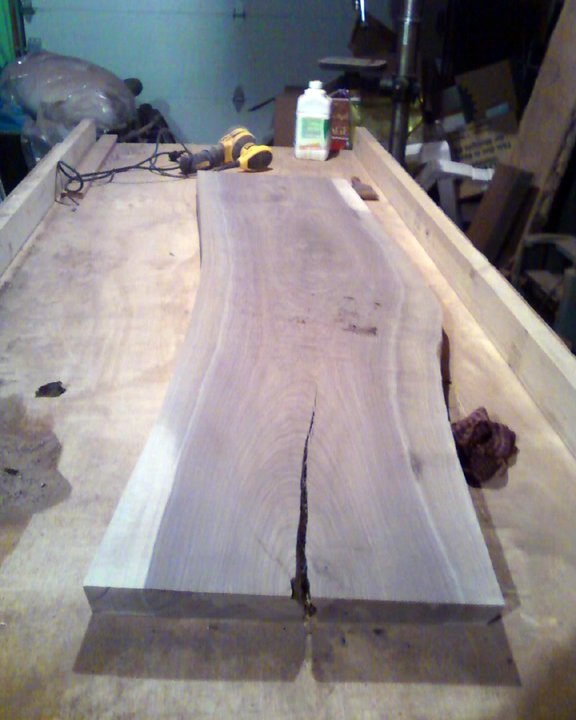 |
| Flattening the slab made a huge difference,and I loved how closely it's shape was to that of the Nakashima bench I'd seen. |
 I'd decided I wanted to do a bench with wide, slab legs on each end, for the sake of building something that would probably hold up longer than if I'd used turned legs on one or both sides. So next I had to map out my mortise and tenons, cut those, and then shape the bottom profile of the slab leg. I used my router to make the mortises and used the bandsaw, router table and handsaw to cut the tenons. After a nice test fit (a perfect 90 degree angle!) I did the glue-up. Nakashima often used a block hidden on the inside of his slab legs to add strength to the joint, so I thought it would be a good idea to do the same. I quickly squared up an extra piece of walnut and got some dowels. I decided two dowels going into the leg, and two going into the bottom of the bench would be more than sufficient. The leg dowels would be blind mortise and tenons, and the ones going into the bench would be through tenons.
I'm almost done with this project, unfortunately it's taken a backseat to everything else I have going on. I have to flatten one more slab leg, cut the mortises and tenons for that and join it. Then it's on to sanding and finishing... I hope to get back to this project within the next month or so! You can view and purchase furniture I've made, like this, here https://www.etsy.com/listing/204007357/live-edge-walnut-side-table-coffee-table?ref=shop_home_active_1.
 |
| Since this project I've stopped tracing my keys with a pencil and instead have used an exacto knife. I have found this method makes it a lot easier to get a nice, snug fit. |
 |
| I love the subtle curve Nakashima used at the base of his bench. It's visually appealing and also serves a purpose: to make the bench sit on all fours, even on an uneven floor. |
 |
| There's something really cool about cutting tenons, especially finishing them off with a hand saw. |
 |
| During glue-up of the leg I had a small mishap and accidentally chipped the edge of the leg in a small area. So, I had to glue and clamp it back on. |
 |
| A perfect 90! Nice... |
 |
| Nakashima did not use through tenons on the dowels in his braces. I decided to go ahead with it because I thought it looked cool and also would provide even more strength and support to the joint. |
 |
| The best surprise, and the thing I am probably most excited about with this project, is the amazing grain all over this walnut. There is "fire" throughout the grain as well as some crazy rippling and feathers going on. Applying the finish to this bench is going to be a labor of love and a fun time. |
 |
| More great grain. Cheap, twisted walnut ended up with a nice secret within. |
Wednesday, January 25, 2012
The Big Burl!
 |
| There she was. How could I resist a beautiful burl like this? |
 So I decided to head up one Saturday morning to see what they had. I wandered around for a few minutes, heard some machinery going in one of the buildings so I headed in, where I met the owner, John. I told him I was interested in just taking a look around. John was a really nice guy. We got to talking about politics and seemed to have similar thoughts on the subject, which I think may have played a part in the deal I was going to get on this particular day. John gave me a tour of the whole operation. I was really impressed. They're pretty much capable of re-sawing and surfacing anything. They had a large amount of lumber air drying, both dimensional and flitch sawn. Interestingly enough, when I walked up to one boule stack of walnut, John said, "oh, that's the Nakashima stuff. That's all reserved." I told John I was familiar with their work and he said, "Mira comes here every now and then. She gets first crack at everything we bring in and reserves stuff." That was a bit of a letdown to hear. Would I get anything worthwhile if it's been gone through?
We headed into a large storage barn and John showed me their current flitch sawn boards. As I walked around, a few distinct large slabs caught my eye. I thought I knew what they were but being a newbie at this I wasn't 100% certain. "Ummm.. is that redwood burl?" I was surprised to see it because I at least knew redwood burl mostly came from CA. Sure enough, John said, "A buddy of mine had a lumber business but unfortunately went out of business, so he had this stuff laying around and sold it to me for cheap." One particular slab really drew me to turn it over and have a look. I asked him how much it was, and he looked it up in a little book and said "$120." This was a big slab. It had to be 5' x 3.5' and about 2.5" inches thick. I immediately said I'd take it (thinking that we had yet to have a coffee table in our formal living room). Unfortunately I only had $100 in my wallet, to which John said, "don't worry about it." So I got the slab for $100. I left feeling like I'd hit the lottery for a small fortune. After googling just what a slab like this normally costs, I felt even better. Depending on where I looked, I got it for maybe 1/8 the price.
 |
| Sometimes craigslist smiles upon you and you just have to accept what's coming to you. A light sanding and two coats of tung oil made the base look amazing. |
And then the power of craigslist reared its head. I often scour furniture on craigslist randomly just to see what's out there. My wife and I have made some pretty good scores. I happened to see this cool looking Danish teak table base on there and it was priced at only $35, which seemed great to me. Sure enough, we headed to Philly and checked it out. It needed to be refinished, but otherwise the thing was solid. It's pretty obvious at one point it had a glass top. Me being the woodworker and all, we didn't need a top. So we bought it, not knowing exactly what we were going to do with it. Shortly thereafter my wife said, "could you use that as the base for the redwood burl table?"
Hmmmm... good question. I did some quick measuring and plopped the slab on top of the base. We both looked at each other and nodded in agreement.
 |
| I loved the look of butterfly keys like this and knew my slab was perfect for adding them to span the gap. |
 |
| Shortly in to making the mortises for the keys, I'd really started to feel comfortable with the process. Maybe being careful but confident was all it took? |
 |
| The little keys seemed like a nice touch and I liked the placement. |
After the keys were in, it was just a matter of routing some small notches on the underside that would sit on the base, then sanding and finishing the slab. I did some experimenting with the finish and finally settled upon something that I liked. I'd seen far too many redwood burl tables with a bazillion coats of poly on them. I knew I didn't want that, but I also wanted the grain to really pop in the light. What I settled on was a combination of a clear gel varnish and single coat of satin poly. I am really pleased with how the table came out. I even considered selling it, but I decided since it was only my second woodworking project, I should hold onto it.
 |
| The two keys, sanded flush. |
I showed him pictures of this redwood burl table and he said I had, "it." I was humbled and asked what he meant by that and he said "you've got the eye for this. You know just where things should go and what's pleasing to the eye." I was really thrilled to hear this. I mean, being an artist and graphic designer I've always had a sense of spacial relationships etc., but being new at woodworking I'm not 100% confident in my abilities. Hearing this from him made my day.
And so the redwood burl coffee table now lives in our living room. At one point in the afternoons the light comes in our front bay window and the grain just gets set afire. An uncle of mine saw it this past Christmas and told me I could sell it for thousands, but really, seeing it and knowing I made it is enough for me.
 |
| A close-up of one of the small butterfly keys I added. You can also see the amazing "birds' eye" grain going on here. |
 |
| I love the swirls that cascade down the side here. |
 |
From certain angles it looks like the table defies gravity.  |
The coffee table
 |
| What I was starting with, after cutting off about 17" from one end for a leg. |
Having never done anything like it before, I was definitely nervous. I didn't want to screw anything up and I knew I was going to need a lot of assistance, especially with how to use both power and hand tools. Having my father-in-law show me every step before I did it was invaluable. In some cases, he'd step in and do things (like cleaning up some of the mortises with a chisel. I was so slow with the chisel!) in the interest of saving time. I spent many weekends working on this table, and my father-in-law would basically have to stop what he was doing each time I finished a step.
First things first: the slab was not flat and was seriously cupped. If I was going to have anything worth its salt I was going to have to make this thing flat. My father-in-law started me off with hand planing the slab leg I'd cut off.
 |
| I was pretty nervous using a router for the first time. However my focus was on going nice and slow so I didn't make any mistakes. |
 |
| The first thing I ever routed. It was pretty rough. |
 So it was time to rout my first real mortise for a butterfly key. Luckily after squaring it up with a chisel it turned out just fine. Next it was a matter of positioning and placing two butterfly keys in the actual table top. I got those in and it was time to focus on joining that slab leg to the underside of the table top. I researched and found how Nakashima handled joints like this. It was usually mortise and tenon joinery, with bit of math mixed in. I figured out how many tenons I should make and their lengths and widths, then used the bandsaw and a handsaw to cut them. My father-in-law helped me set up a jig to rout a rabbet on the underside of the top because I'd chosen not to flatten the bottom in order to preserve some of the thickness of the slab. Then I used the same jig to help me rout the mortises.
After some fine tuning of the mortises with a chisel, I lined the mortises with epoxy and tapped the slab leg home. It ended up going in perfectly square!
I bought some walnut leg blanks to turn two tapered legs for the other side of the table. I went as far as to trace a Nakashima leg in Adobe Illustrator so I could make my legs the same exact dimensions. After some instruction on the lathe from my father-in-law, I jumped right in and turned the legs. I was really happy with the result! I tapped a bolt into the legs and fashioned some steel plates to serve as a mount for them and finally screwed them in place. The table was really coming together now. All that was left was more sanding and the finish.
 |
| The table assembled, before final sanding and finishing. |
 |
| I really love the satin-like finish. I am not a fan of poly finishes. I hate when a piece of furniture looks like its coated in plastic and soaking wet all the time! |
 |
| A look at the finished top. |
Tuesday, January 24, 2012
An Idea is Planted
 |
| Something like this would be perfect in our living room! |
| George Nakashima sits on his famous cantilevered "Conoid Chair" |
My original plan seemed quick and easy to me. I was simply going to go to a local lumber yard, buy a live edge slab of some species of wood, make it flat and sand and finish it, then screw in 3 pre-made, tapered Danish-style legs.
Enter: the father-in-law. My father-in-law is an award-winning decoy carver. He's made his fair share of furniture too and done it well. He has a shop with nearly anything and everything a woodworker could need. When he got wind of my intentions to make this "easy" coffee table, he said, "you're going to build this the right way." After some hesitation I agreed it was the best thing to do.
| One of the many buildings available to tour on the Nakashima property, many of which George built with his own hands. George Nakashima came from humble beginnings and he and his family suffered many hardships before he emerged as a prominent figurehead in the history of furniture design. |
 |
| The property is filled with beautiful examples of Nakashima's furniture. |
Subscribe to:
Posts (Atom)